


Table of Contents
How about starting the game with breakfast? I thought of the cheese slices I made from felt for the breakfast plate. Of course, you can use felt cheese blocks in all areas of toy kitchen games. For example, you can add felt cheese and tomato slices to your felt pasta.
Felt cheese slices are the perfect addition to other felt food toys. Felt cheese blocks offer a fun variety of play dishes ideal for play kitchens, playsets, or even grill sets.
I designed the felt cheese slices to be as simple as possible. However, it requires some hand sewing to make the spots on the cheese slice. You can find detailed instructions, pictures, and videos on making felt cheese blocks in my article.
You can find the free felt cheese slice or block pattern below, download it to your computer, print it out, and start working. To add some diversity to your felt food, cut the felt pattern in slightly various ways and sew different-looking felt cheese slices.
Felt cheese blocks can be made with craft felts in yellow hues, but you can also try wool blend felts for more authentic colors and play durability. Usually, cheeses have many different colors, so you can create your dream felt cheese slice by choosing felts in different colors.
Felt cheese blocks are a simple hand sewing project that requires only basic sewing skills. You can also make a felt cheese slice using the blanket stitch, the whip stitch, and the French stitch. If you don’t know how to do the blanket stitch, French stitch, or whip stitch, you can learn the felt stitching details by browsing our embroidery guide.
Given the shapes, the felt cheese blocks template is easy to cut by hand. You can review our article “How to Cut Felt and Felt Patterns,” which includes information on cutting felt patterns. In this way, you can perform the felt cutting process faster.
See Also: How to Cut Felt and Felt Patterns
Felt toys are great toys for your child’s educational purposes. I’m sure they’re exciting and fun and will add a lot of joy to people’s lives.
Skill level: Novice friendly, beginner-friendly.
Completion Time: Approximately 30 minutes. It may take a little longer on the first try.
Finished size: approx. 2.5′ (6 cm)
Tip: After sewing the felt cheese blocks, roll them in your hand to smooth the seams and lumps.
Helpful Note: Felt is a textile product in which natural or synthetic fibers are pressed together. Some felts are very soft, but others are pretty stiff and strong enough to be used as a building material. I generally use 2 mm – 3 mm thick acrylic felts in my works. When washing, I did not experience shrinkage and elongation problems, but you may experience such issues with some soft felts. With a bit of trial and error, you can get to know the felt you use better.
You can find the free felt cheese block pattern at the bottom of the article and download it to your computer.
You can also read our article “What are the Felt Types” to learn more about felt types.
Warning: We all know that children have vivid imaginations. Some children can actually bite the felt food, and especially young children can suck the felt toys by putting them in their mouths. But, of course, we do not want our children to swallow the residues of industrial production. So, don’t forget to disinfect the felts before starting DIY felting projects.
Tip: I use a sewing needle as fine as possible when sewing felt toys. Because when you use a thin sewing needle while sewing felt, the points where the needles sink are not very obvious, and sewing felt is much easier.
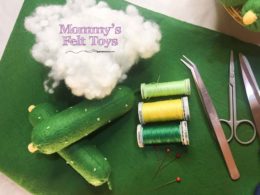
Tools Needed for Sewing Felt Cheese Slices and Blocks
- Craft Scissors
- Detail Scissors
- Embroidery Needle
- Flat Pins
- Wooden Skewer or Stick
- Cutting Machine – Cricut Maker or Silhouette Cameo 4 (It is optional, not mandatory for cutting template shapes.)
Materials Needed for Sewing Felt Cheese Slices and Blocks
- Wool Blend Felt – Felt colors in yellow tones are suitable.
- Embroidery Thread — Similar yellow tone felts are suitable.
- Polyester Fiber Filling
How Are Cheese Blocks Made From Felt?
For the felt cheese blocks, you will need 2 triangular felt pieces, 1 felt bit to wrap around our cheese, and 1 more yellow felt part. The circles I drew on the triangular cheese blocks make the cheese slices more realistic.
- Print the felt cheese slice pattern on the printer.
- Place the felt cheese slice pattern on the felt and cut the felts according to the pattern.
- Fix the felt pieces you cut to each other with the help of a needle so that they do not slip while sewing.
- First of all, drill the part holes that will be perforated.
- Then secure around the holes with stitches.
- Put the darker felt piece under the perforated surface and fasten it together with a needle.
- Sew the felt strip around the cheese, starting from the most comfortable part of the triangle.
- Then sew the bottom base to the strip, but leave a small gap to fill the fiber inside.
- Fill the fiberfill from felt to cheese through the small gap you left and close the gap by sewing.
- Here are your felt cheese blocks ready 😊
You can train your little ones by adding felt dishes to your games. You can also help your children develop an awareness of healthy eating with felt food toys. Felt dishes will be an indispensable addition to your children’s play kitchen and make imaginary games more enjoyable.
More Felt Food Projects: Of course, these are not the only options for making your own felt vegetables and fruits. If you want to add more felt vegetable and fruit toys to your collection, try the following fun projects:
Making toys from felt food is accessible to DIY projects requiring minimal sewing skills. However, basic sewing skills are all you need to make felt patterns a reality.
All the felt toys I share and recommend to you are sewn by hand and do not require a sewing machine. With this easy DIY felt patterns and simple instructions I offer you, you can finish the project idea in a short time. Eventually, you’ll have beautiful felt foods that will pay off for your efforts.
You may want to print the patterns on a more rigid material to make the felt pattern last longer. Then, you can draw the pattern by tracing the shapes on the felt using a ballpoint pen on the hard material. After removing the pattern, secure the felt before cutting to prevent the layers from shifting.
The felt pattern files are in PDF format and are printed on A4 paper. To read PDF files, you’ll need Adobe Reader. Adobe Reader is available for free download and installation from Adobe’s website.
You can use a copier to expand or reduce the size of the design before cutting it out if you want larger or smaller objects.
Yum! Felt Food for a Happy Day!


Thanks for your blog, nice to read. Do not stop.